*This tutorial uses Photoshop (which is what I favor over all the free online design programs). Here is your tool palette key:
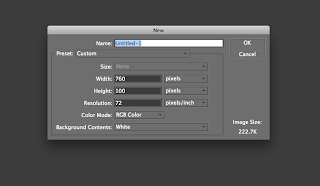
 1. Create your canvas. Go to File>New>Blank file. A box will pop up asking you to set the dimensions (name the file if you like). For an Etsy shop banner the dimensions are 760 pixels wide by 100 pixels high. I have my resolution set to 72, but you can alter that if you like.
Or the blue from the road (photo all the way to the right)…
-Select the paint bucket tool and click inside your empty canvas to set the background color.
#1 (of step 3) Use a few pictures of your products to highlight some of your work. This method is fairly simple:
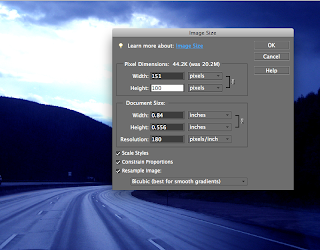
 -Open the image files you'd like to use and resize each so that they fit into your banner nicely. Since we set the height to 100 pixels, we want the focal point images to be the same height. To accomplish this go to Image>Resize>Image size. A box will pop up. Make sure the little box on the bottom for "constrain proportions" is checked. Then change the height to 100 pixels (the width will change automatically to keep the image proportional).
-Select the move tool, click on the resized image and drag into the banner. The smaller image should fit perfectly (height wise). Then use the move tool to arrange it as you like. Follow the same steps for all the pictures you want to include in your banner.
#2 (of Step 3) Use a portion of an image. This may not work for everyone. I think it's a great method for art-related shops (photography, painting, etc) but could work nicely for anyone given they have product shots that would make sense aesthetically.
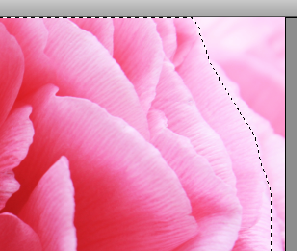
 -To use the lasso, you click at your starting point on the image and drag to carefully trace the outline of the object you'd like to use. This does require a (somewhat) steady hand and some patience, but if you are lassoing something artistic (part of a photograph or painting) I feel there is more room for error.
 -Once you release the lasso you should see the outline of the object is selected. Now copy and paste. A duplicate of what you lassoed will appear. You may not see it if it is directly on top of the original so select the move tool and click to move it.
-If you want the image to fit completely inside the banner, you will need to resize it (see instructions in #1 of Step 3). The size you need to change it to will depend on the size of the portion of the original photo you used. You can try changing the height to somewhere between 100-300 pixels high, which you can adjust if it's too big or small (but you have to adjust the size in the original file, not the banner file). Or you can leave the size as is if you want the image to bleed past the edges, as I did with the pink flower in this banner:
-After you've decided on a size, use the move tool to click and drag the image into your banner and arrange it to your liking.
4. Add your shop name (and a tag line if you like). Just like I enjoy customizing my colors, I also enjoy customizing my fonts. I typically download most of the fonts I use and my go-to website for that is www.dafont.com. When you find a font you like, simply download it to your desktop. Then click on the file you downloaded and "install font." As you might have guessed, I also customize the color of the font by using the eye dropper trick again. To create a more cohesive color palette within my banner, I will suck up color from one of the images I've added.
*Please note that if you do this while you are already in Photoshop, you may have to close and reopen the program to refresh the fonts so the new one shows up.
5. Save the file as a jpg (you will have to change it from a psd file). Then upload it to Etsy!
I realize this was a LONG tutorial, but I hope it helps someone out there looking to create a unique, custom banner without paying someone else or going to graphic design school.
This is the first time I've ever attempted to do a computer-related how-to so if I've been unclear or you have questions, don't hesitate to ask!


GRRREAT tutorial girl...I will be saving this one for the fabulous day when I get a new computer with photoshop- until then I will admire your beautiful new banner- LOVE!
ReplyDeletethanks hannah!!!
ReplyDelete